How to Install a Keypad Door Lock
You can install a keypad door lock in about 20 to 30 minutes with just a screwdriver, as long as the door already has a deadbolt hole. Remove the old lock, fit the new latch and strike, mount the interior and exterior keypads, then program a user code.
On this page (10 sections)
- What do you need before you install a keypad door lock?
- How do you remove the old deadbolt?
- How do you fit the latch and strike plate?
- How do you mount the keypad and interior assembly?
- Which keypad lock should you install?
- Do you need to drill new holes?
- How do you set the first code and test the lock?
- How does the keypad lock work once it's installed?
- Are keypad door locks safe after installation?
- What should you check before you start installing a keypad door lock?
You can install a keypad door lock in about 20 to 30 minutes with just a screwdriver, provided the door already has a deadbolt hole. Remove the old lock, fit the new latch and strike, mount the interior and exterior keypads, then program a user code.
That short version is the whole job on a door that already had a deadbolt. Most homes do, because the keypad lock replaces the deadbolt in the same openings.
If the door has never had a deadbolt, read the hole-cutting sections below before you start.
What do you need before you install a keypad door lock?
Gather a screwdriver, the hardware in the box, and your door measurements before you touch the old lock. A tape measure and a few minutes of checking save a return trip to the hardware store.
Check three numbers first. Standard deadbolts use a 2 1/8 inch hole through the face of the door, a 1 inch hole in the edge for the latch, and a backset of either 2 3/8 or 2 3/4 inches from the door edge to the center of the big hole.
If you don't know your backset, our guide to how to measure door backset walks through it with a tape measure.
Also check the door thickness. Standard deadbolts fit 1 3/8 inch to 1 3/4 inch doors, so measure yours and compare it with the lock's fit guide before you buy.
A thick exterior door can need a longer latch, so confirm the fit before buying.
How do you remove the old deadbolt?
Unscrew the interior thumb turn first, then pull both halves of the old lock apart. Removing a deadbolt takes about five minutes and needs only a screwdriver.
- Open the door and find the two long screws on the interior side, usually beside or above the thumb turn.
- Hold the exterior half while you loosen the screws so it doesn't fall.
- Pull the interior plate off, then slide the exterior half out of the door.
- Remove the two screws holding the latch in the door edge, and slide the latch out.
- Take out the strike plate screws on the frame, but leave the plate in place for now.
Keep the old lock and screws together in a bag in case you need to reinstall it. Wipe the cutouts so no wood splinters or old paint block the new hardware.
How do you fit the latch and strike plate?
Slide the new latch into the edge hole with the bevel facing the direction the door closes, then screw it down. The bevel lets the door slide past the strike without a hard shove.
Some latches are adjustable for 2 3/8 or 2 3/4 inch backsets. If yours has a sliding or flip section, set it to match your measured backset before installing.
Tighten the two latch screws firmly, but don't overtighten and split the door edge.
Next, align the strike plate on the frame. The latch should slide into the strike's opening without rubbing.
If the opening sits too high or low, the door will stick, so loosen the screws and shift the plate slightly. Reuse the old screw holes when they line up.
How do you mount the keypad and interior assembly?
Feed the cable through the door, hold the exterior keypad against the face, and attach the interior plate from the inside. The keypads sandwich the door and the latch in one stack.
On models with a cable, like the Kwikset SmartCode 270 touchpad, thread the connector through the large hole and seat the exterior keypad against the door. Hold it steady with one hand while you position the interior assembly over the cable on the inside.
Line up the mounting plate's screw holes with the posts on the exterior half. Start the two long screws by hand so you don't cross the threads.
Tighten them evenly, alternating sides, until both halves sit flush against the door with no wobble.
Check that the thumb turn on the inside moves freely and throws the deadbolt. If it binds, loosen the screws slightly and shift the assembly until the bolt slides smoothly.
Which keypad lock should you install?
All three picks below are Kwikset keypad deadbolts that install with a screwdriver. They differ in keypad type, code capacity, and how the lock meets the door.
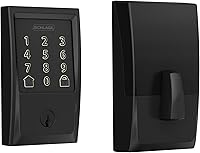
The SmartCode 270 steps up to a touchpad with no raised buttons, 50 user codes, 10 one-time codes, and the same auto lock choices. It carries Grade 2 BHMA certification, which Kwikset says is up to 2.5 times stronger than Grade 3 locks.
The matte black finish and rectangular shape suit modern doors.
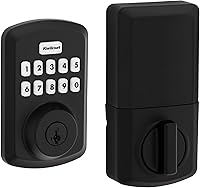
The Powerbolt 250 is the straightforward choice. It uses a 10-button keypad with bright LED lights for night entry, holds 25 user codes plus 5 one-time codes, and can lock itself after a set delay from 30 seconds to 10 minutes.
The included hardware covers the exterior and interior deadbolt, latch, strike, and mounting plate.
The SmartCode 260 pairs the button keypad with 50 user codes and Grade 2 BHMA certification. Kwikset treats its hardware with Microban protection on the keypad surface, and the Venetian Bronze finish suits traditional doors.
It also offers one-touch locking and a back-lit keypad.
Do you need to drill new holes?
No, if your door already has standard deadbolt cutouts. A keypad deadbolt drops into the same 2 1/8 inch face hole, 1 inch edge hole, and strike position as the lock you removed.
You only drill when the door has no deadbolt, or the old holes sit too close to the frame to fit the new lock's backset. That means marking the height first, usually 38 to 40 inches from the floor to the center of the hole.
Then use a hole saw for the face hole and a drill bit for the edge hole, keeping the drill level so the two holes meet.
For a new installation, follow the template in the box. Most keypad locks ship with a paper or 3D guide that shows the exact hole positions.
Kwikset's BILT app adds voice and animation steps for the same process.
How do you set the first code and test the lock?
Follow the included programming guide to replace the default code, then add your own user codes. Every model uses its own sequence, so the steps in the box take priority over any general advice.
On Kwikset keypad locks, programming usually starts by pressing the programming button on the interior assembly and entering the default programming code. You then enter a new user code and repeat it to confirm.
Change the factory default first, before you add codes for family or guests.
Test the lock while the door is open. Enter your code and watch the deadbolt throw, then use the thumb turn.
Try a wrong code to confirm the keypad reacts as designed. Our guide to how to change a keypad door lock code covers editing and deleting codes later.
Finally, close the door and check that the deadbolt slides into the strike without rubbing. If it catches, adjust the strike plate or the lock's position before you rely on it.
How does the keypad lock work once it's installed?
A keypad lock is an electronic deadbolt: the keypad sends a code to a motor or solenoid that throws the bolt. The electronics live in the exterior keypad, and the batteries sit in the interior assembly on most models.
A few features matter for daily use. Auto lock can throw the deadbolt on its own after a delay, and an intrusion alert sounds an alarm and disables the keypad for a minute after three wrong codes.
Vacation mode turns the keypad off while you're away. Our explainer on how an electronic door lock works covers the motor, sensors, and battery setup in more detail.
Battery life is the main maintenance item. Kwikset rates these locks at 12 months or more on 4 AA alkaline batteries, so keep spares on hand.
Many models give a low-battery warning before the keypad stops responding.
Are keypad door locks safe after installation?
Yes, when the lock is installed correctly and the default code is changed. The deadbolt itself does the security work, so a keypad lock is only as strong as its bolt and strike.
A keypad adds some risks a keyed lock doesn't have. Someone standing close can watch you enter your code, and a weak code like 1234 is easy to guess.
Use a longer code, change it when a guest moves out, and set a one-time code for visitors instead of a permanent one. Our guide to whether keyless door locks are safe covers picking codes and spotting weak installation.
Also check the fit. A deadbolt that doesn't fully seat in the strike leaves the door easier to force.
If the bolt rattles or the door moves when locked, adjust the strike before you call the job done.
What should you check before you start installing a keypad door lock?
Installing a keypad door lock comes down to four checks: the door has standard deadbolt holes, the backset matches, the latch bevel faces the right way, and the first code replaces the default. Skip any one and the lock will fit poorly or stay insecure.
Measure first. If the backset or door thickness doesn't match the lock's fit range, choose a different model rather than drilling a new hole.
For most homes, the Powerbolt 250 is the simplest screwdriver swap. Pick the SmartCode 270 if you want a touchpad and 50 codes, or the SmartCode 260 for the same code capacity in a bronze finish.
Keep the old lock until the new one has passed a week of daily use. If the deadbolt sticks or the keypad acts up, you'll know whether the fit or the lock is the problem before you change anything else.
Frequently asked questions
How long does it take to install a keypad door lock?
Most keypad deadbolt swaps take about 20 to 30 minutes once the old lock is off. The job is four steps: remove the old deadbolt, fit the latch and strike, mount the keypads, and set the first code.
A brand-new hole takes longer.
Do I need to drill a new hole for a keypad door lock?
No, if your door already has a standard 2 1/8 inch deadbolt hole and a 1 inch edge hole. A keypad deadbolt replaces the old deadbolt in the same openings.
You only drill when the door has never had a deadbolt, or the old holes sit too far from the edge.
How do I set the first code on a keypad door lock?
Every model uses its own programming sequence, so follow the included guide. Kwikset locks typically start with a default programming code you press before entering a new user code.
Change the default right away, then add codes for family and guests.
Can I install a keypad door lock on a metal or glass door?
Some keypad deadbolts work on metal doors that already have the right cutouts, but glass doors need a different mounting approach. Check the lock's fit guide before you buy, and measure the door thickness.
Standard deadbolts are made for wood or metal entry doors, not glass.