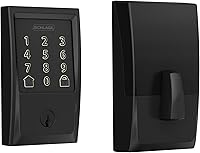
How to Install a Kwikset Halo Smart Lock
You install a Kwikset Halo smart lock with a screwdriver and no wiring, replacing your old deadbolt in minutes. Mount the exterior keypad and interior assembly, load the batteries, then pair the lock in the Kwikset app over Wi-Fi.
On this page (9 sections)
- What do you need before installing a Kwikset Halo?
- How do you remove the old deadbolt?
- How do you install the Kwikset Halo deadbolt?
- How do you set up the Kwikset app and connect Wi-Fi?
- How do you add codes and control the lock from the app?
- Which Kwikset Halo model should you install?
- How do you test the lock after installation?
- How do you keep a Kwikset Halo working outdoors?
- What should you check before you finish?
You install a Kwikset Halo smart lock with a screwdriver and no wiring. Take off the old deadbolt, fit the new latch and both halves of the lock, add batteries, then pair it in the Kwikset app over Wi-Fi.
The whole job is a straightforward swap if your door already has a deadbolt hole.
This guide walks through how to install a Kwikset Halo smart lock step by step, from measuring the door to your first app open.
What do you need before installing a Kwikset Halo?
Gather a Phillips screwdriver, a tape measure and your phone before you touch the old lock. The Halo box carries the deadbolt halves, latch, strike, mounting plate, two keys, the SmartKey learn tool, hardware, the install guide and batteries.
The Select and Select Plus come with the same parts kit, so one set of tools covers all three models.
Check the door first. Kwikset says the Halo fits doors 1-3/8 to 1-3/4 inches thick, with a deadbolt backset that adjusts from 2-1/8 to 2-3/4 inches.
Measure the door edge and the backset so you know the existing holes line up.
Have your Wi-Fi name and password ready for setup. The lock connects on its own, so a 2.4 GHz signal that reaches the door is enough to get it online.
A deadbolt hole that already sits at the right backset saves you from drilling anything new.
How do you remove the old deadbolt?
Unscrew the interior thumb turn first, then the exterior half. Open the door and take out the two screws on the inside plate, then pull the interior assembly away from the door.
Slide the old latch out of the edge hole and remove the strike plate from the frame if you're replacing it too. Keep the screws in a cup so they don't roll away.
Check that the door edge hole is clean and free of splinters. If the old deadbolt left paint or debris around the hole, wipe it out before the new latch goes in.
A clean hole lets the new latch sit flush, which matters for a smooth bolt throw.
How do you install the Kwikset Halo deadbolt?
Fit the latch, then the exterior keypad, then the interior assembly. Set the latch in the edge hole with the curved side facing the door stop and screw it in.
Feed the exterior keypad through the outside hole and hold it in place. Attach the mounting plate and connect the cable to the interior assembly as the guide shows.
The guide is short and picture-led, and the cable has one correct orientation, so check it before you tighten anything down.
Line up the interior half and drive the long mounting screws through it into the exterior keypad. Tighten them evenly so the two halves sit flat, but stop before you squeeze the door.
Check the deadbolt throws smoothly with the thumb turn before you add batteries. If it sticks, loosen the screws slightly or check that the strike lines up with the bolt.
How do you set up the Kwikset app and connect Wi-Fi?
Download the Kwikset app, create an account and follow the guided setup for your model. The app walks you through scanning or choosing the lock, then joining it to your Wi-Fi network.
The Select and Select Plus use the same app and the same guided flow as the base Halo, so the steps match whichever model you bought.
Keep your phone close to the lock during pairing. Enter your network name and password when asked, and give the app a minute to finish.
Once the lock is online, name it, set the time zone and choose your admin code. The app is also where you turn on geofencing, auto-lock and notifications for intrusion attempts.
On the base Halo, the app shows an activity history and sends an alert for invalid code attempts or tampering.
If pairing stalls, move closer to the router or restart the lock by removing and replacing a battery. A weak signal at the door is the usual cause.
If you chose the Select or Select Plus and want Matter, the app also guides you through adding the lock to Apple Home or your chosen platform.
How do you add codes and control the lock from the app?
Open the app's lock screen to create codes, set auto-lock and share guest access. The touchscreen supports up to 250 access codes, so there's room for family, guests and helpers.
Codes can be temporary, scheduled or permanent, which covers a dog sitter for a weekend as easily as a family member for years.
Create a temporary code for a visitor and set when it expires. For family, use a permanent code and check the event log when you want to see who came and went.
The event log also records door and lock status on the Select line, so you can confirm the door actually locked after someone left.
Set auto-lock so the door locks itself after a chosen time. Turn on geofencing if you want the lock to open as you arrive home.
Both settings are optional and can be changed at any time.
Voice control works through Amazon Alexa or Google Home on the base Halo. Say the lock's name to lock or open, and build routines around it.
The Select and Select Plus add Apple Home on top of those two.
Which Kwikset Halo model should you install?
The Halo line shares the same basic install, so pick the model by how you want to control it. The three versions differ in wireless features and smart home support, not in the screwdriver work.
Who should choose the Kwikset Halo Wi-Fi?
The Halo Wi-Fi suits most front doors. It connects straight to Wi-Fi with no hub and works with Alexa or Google Home for voice control.
It has a backlit touchscreen for keyless entry and a lifetime mechanical and finish warranty, plus a 1-year electronics warranty. Its Venetian Bronze finish is a warmer tone than the matte black of the two Select models.
Skip it if you want Apple Home or Matter support.
Who should choose the Kwikset Halo Select?
The Halo Select adds Matter on top of Wi-Fi. That puts it in Apple Home, Alexa and Google Home without a hub and keeps one app for your smart devices.
Matter is the part that makes it easy to manage the lock next to other smart home gear in a single app.
The setup is guided from the app, and the install still needs only a screwdriver. It has the same 250 access codes and a Grade AAA rating.
Pick this one if you run a mixed smart home. Its matte black finish is a modern look for a front door, though some buyers may prefer the bronze of the base model.
Who should choose the Kwikset Halo Select Plus?
The Halo Select Plus adds NFC and Apple home keys. Tap an iPhone or Apple Watch on the lock to open it, with Matter and Wi-Fi covering the rest.
The tap feature works with Apple devices, so Android households should look at the Halo Select instead. For a wider comparison, see our roundup of the best Kwikset smart locks.
How do you test the lock after installation?
Run the keypad, the app and the key once each before you rely on the lock. Enter a code on the touchscreen and confirm the deadbolt throws and retracts.
Lock and open from the app while standing at the door.
Check the event log updates so you know the connection works.
Use one of the included keys to turn the cylinder. If it feels stiff, recheck that the bolt lines up with the strike.
You can also use the included SmartKey learn tool to rekey the cylinder to match an existing Kwikset key, so the Halo can join the keys you already carry.
Open and close the door a few times to make sure the bolt doesn't drag. Adjust the strike plate if it catches.
How do you keep a Kwikset Halo working outdoors?
Keep the keypad clean and the batteries fresh, since the Halo is built for exterior doors with weather-resistant features. Wipe the touchscreen with a soft cloth and avoid harsh cleaners that could dull the finish.
Replace the batteries when the app warns you, before they run down completely. Dead batteries leave the keypad and app control offline, though the key still works.
If your door is exposed to hard weather, keep a spare set on hand and change them on a schedule rather than waiting for the warning.
Check the seal and the bolt in changing seasons. Our guide on whether smart locks are weatherproof covers what to expect from an outdoor lock in rain, heat and cold.
If you're weighing a lower-cost keypad lock for a back door, our roundup of the best cheap smart locks is a good next stop. And if you prefer a different brand, the steps in our guide on how to install a Yale smart lock follow the same screwdriver-first pattern.
What should you check before you finish?
Finish by confirming the lock, key and app all work, and set your auto-lock and codes in the app. A Kwikset Halo install is a screwdriver job, so most of the time goes into the setup rather than the hardware.
The Halo Select earns our top score for its Matter support and guided app setup. Choose the base Halo Wi-Fi if you want a no-hub lock and don't need Apple Home, or the Select Plus if tap-to-open with an iPhone matters to you.
After the first week, look at the event log to see how the lock behaves. That tells you whether your codes and auto-lock settings fit how your household actually comes and goes.
If you left a temporary code for a guest, delete it once they've gone.
Frequently asked questions
Do I need a hub to install a Kwikset Halo smart lock?
No. The Halo line has Wi-Fi built in, so it connects straight to your home network and the Kwikset app without a separate hub.
You only need a 2.4 GHz Wi-Fi signal near the door and the app on your phone.
What tools do I need to install a Kwikset Halo smart lock?
A Phillips screwdriver is the main tool. The box includes the deadbolt, latch, strike, mounting plate, keys, SmartKey learn tool and batteries, so you don't need a drill for the standard swap.
Have a tape measure handy to check door thickness.
How thick does my door need to be for a Kwikset Halo lock?
Kwikset says the Halo fits doors between 1-3/8 and 1-3/4 inches thick, with an adjustable deadbolt backset from 2-1/8 to 2-3/4 inches. Measure your door edge before you start so you know the lock will fit the existing holes.
Can I keep using my old keys with a Kwikset Halo smart lock?
The Halo uses Kwikset's SmartKey system, so a locksmith or the included learn tool can rekey the cylinder to match an existing Kwikset key. You can also use the app, the touchscreen or a key, so the lock works however you prefer to get in.
How long do the batteries last in a Kwikset Halo smart lock?
Kwikset doesn't publish a set battery life figure, and it depends on how often the lock is used and how strong your Wi-Fi signal is. The lock runs on standard batteries included in the box, and the app warns you when power runs low so you can swap them in time.